User interface basics
by Jan Depner - ![]() , Alexandre Prokoudine
, Alexandre Prokoudine
v1.1, available under terms of GNU General Public License v2, 27 April 2005
JAMin's main window can be maximized to any screen size with 800x600 pixels as bare minimum. We strongly recommend to use at least 1024x768 for reasons, been explained in a chapter about Hand-drawn EQ (HDEQ)
1. Main parts of interface
1.1. Transport controls

The transport controls give you the usual tape transport type controls. These are useful if you are using other JACK enabled applications that honor the JACK transport control functions (ecamegapedal, Ardour). Note that there is no stop button (use pause).

Some JACK and system status information is available to the right of the transport buttons.
1.2. Scenes

Scenes are used to save and recall an entire group of JAMin parameter settings during a session. After setting all of the parameters for a specific section of music (verse, chorus, bridge) or a complete song you can right click on a scene button, use the menu to 'Set' that scene, then use the 'Name' entry of the menu to enter a name for that scene (Back Alley Fugue - verse). You can recall these settings by left clicking on the scene button. A bright green button means that the scene associated with this button is currently the active scene. A dull green button signifies that the scene is loaded but not active. A red button means that the scene has no settings loaded. A bright yellow button means that this scene is active but the settings have been changed. If you want to save the settings you must use the 'Set' entry in the button's right click menu. You can clear settings from a button using the right click menu and the 'Clear' entry.
The keyboard accelerators for the scene buttons are the number keys, 1 through 0 for scenes 1 through 10. Shift+1 through Shift+0 will access scenes 11 through 20. For example, pressing the 1 key will cause scene 1 to become active. Pressing Shift+5 will cause scene 15 to become active. The ALT modifier can be used to assign settings to a scene button (instead of using the scene button menus). Pressing Alt+Shift+5 will assign the current settings to scene button 15 (you may still want to change the name). The Ctrl modifier can be used to clear a scene button. Pressing Ctrl+4 will clear scene button 4.
Note that the keypad keys may be used but only for scenes 1 through 10 with Num Lock on. Using the keypad with Num Lock off will access the cursor keys (which can be used to control some aspects of the GUI). Using Shift with the keypad with Num Lock on will also access the cursor keys.
1.3. Input

The input section allows you to increase or decrease input gain. It also allows you to change the input balance. The meters show the stereo input signal strength. You can reset the input gain or balance back to 0/center by right clicking on the gain/balance control.
Signal levels during mastering are critical. If they are too
low,
the mix volume won't compete with other products. If they are too high
it can cause clipping and duplication houses might refuse to process
the
job because they can be blamed for the problem. A good guideline
is to not run input signal levels that exceed
0db.
1.4. Hand-drawn EQ (HDEQ)

The hand-drawn EQ is the most complex part of the JAMin GUI. If you are familiar with graphic EQs the hand-drawn EQ should be a fairly easy concept to grasp. Basically the HDEQ is a drawing area with a log scale in the X direction. The area starts at 25Hz on the left and ends at 20KHz on the right. In the Y direction it is +/- a user definable number of dB (limits are set in the EQ options window). Basically, the hand-drawn EQ gives you 1024 bands of EQ. Of course if you move the cursor quickly when drawing the curve or you have the screen sized to less than 1024 pixels in width you won't be able to define every band by hand. The curve is actually splined to 1024 bands from the user input.
The solid white line in the above graphic is the actual EQ curve to be used for processing the data. The curve is drawn by left-clicking the mouse at some point in the window and moving to the right or left as you draw the curve. Left-clicking again will end the curve. If you don't like the curve you have drawn you can middle or right-click to discard it. You do not need to draw the entire curve. Small sections can be drawn to correct parts of the curve. The algorithm used will spline the input points to the currently existing curve. To put in a very narrow notch filter you can simply place the pencil cursor somewhere on the screen and click twice. The only problem with this is that you have to know exactly where you want the notch. If you want to reset the entire curve and all parametric controls you can simply right-click in the window.
Most mastering applications include a parametric EQ for doing notch filters and sliding EQ sections with adjustable gain and width (Q). In JAMin we have moved away from rotary knobs for this functionality (knobs in a GUI are sort of counterproductive anyway). In the above graphic you can see a number of small yellow shapes on the EQ curve. These are the parametric EQ "handles". The rectangles control the gain and position of the section and the semicircles control the width. Note that the first and last handles do not have width controls. These would correspond to parametric shelving controls. To manipulate the parametric controls you merely left-click on the handle of choice, drag it to the location you want and then release it. Dragging either the left or right width control for a parametric section will cause the other width control to move as well. You cannot drag or widen one parameter over another. If you grab and drag the rectangular "center" control you will see that the parametric sections slide along the previously defined EQ curve. You can use <Ctrl>-left-click on the notch handle to reset a notch.
The red and blue lines represent the crossover positions. They are mainly included so that you can see exactly where in the frequency spectrum you are placing the crossovers but they can be manipulated as well. Left-click in the box at the top or bottom of the line and you can drag the crossovers. Moving these will cause the crossover controls to move and moving the crossover controls will cause these lines to move.
The thin white line is the power spectrum of the signal. This can represent Pre EQ, Post EQ, Post Compressor, or Output signal as defined in the EQ options menu. By default it is Post EQ. The spectrum Y scale is 0dB at the top to -90dB at the bottom.
The background scale is a log scale in the X direction. At the bottom of the HDEQ is a position display that shows the X position of the cursor in frequency and the Y position of the cursor in relation to both the EQ curve and the spectrum display. Changes to the HDEQ will be reflected in the 30 band graphic EQ (GEQ) and changes in the GEQ will be reflected in the HDEQ.
1.5. 30 band graphic EQ (GEQ)

The 30 band graphic EQ (GEQ) was originally designed to be the main EQ for JAMin but the hand-drawn EQ (HDEQ) proved to be as easy to manipulate with much more functionality. The GEQ is now included mostly for visually impaired users as it can be manipulated using the tab and arrow keys. Changes to the HDEQ will be reflected in the GEQ and changes in the GEQ will be reflected in the HDEQ. Clicking the right mouse button on a GEQ control will reset the value to 0.0.
1.6. Spectrum

The spectrum display shows the power spectrum of the signal in bands that correspond to the frequency bands in the 30 band EQ (GEQ). In addition it displays the maximum value reached for each band as a yellow line.
1.7. Compressor curves

The compressor curves are a graphic display of the parameter settings in the compressors. There is one box each for the low, mid, and high band compressors. The low, mid, and high freqency bands are defined by the crossovers. The thick black line represents the 0dB level. To get an idea of how these lines represent the compression settings just start playing with the compressor parameters. When the cursor is moved into one of the compressor curve boxes the title is highlighted along with the title of the corresponding compressor. Also, the position of the cursor in X and Y is displayed, where X represents input dB and Y represents output dB.
1.8. Crossover

The crossover is used to set the low, mid, and high bands for the compressors and stereo controls. The display is in frequency (25Hz to 20KHz). Moving these will cause the crossover bars in the hand-drawn EQ (HDEQ) to move as well as the range displays in the compressor windows. You can use the EQ bypass button to bypass the EQ processing (i.e. flatten the EQ curve) so that you can hear the effect of the EQ curve on the sound.
1.9. Compressors

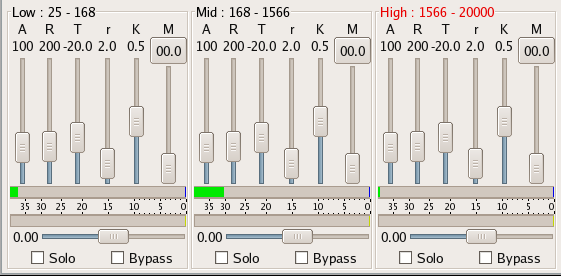
Multiband compression is arguably the most important part of the mastering process. Each band has attack (A), release (R), threshold (T), ratio (r), knee (K), and makeup gain (M) controls. In addition there is an automatic makeup gain button (AM) and meters showing signal (top) and compression (bottom). An explanation of how compression works is beyond the scope of this document. More detail can be gained from Ron Parker's mastering documentation (TBD) and websites such as Harmony Central's effects section, or Rane's Good Dynamics Processing article (PDF). Another way to find information is to do a Google search on "dynamics processing". Compressor controls can be "ganged" by clicking on the control label (A, R, T, r, K, M) in the desired compressor band windows. When they are ganged moving one control will move all other ganged controls by the same amount. To ungang just click on the label again. The labels change to the band color (rgb) to indicate that they are ganged.
1.10. Stereo controls

The stereo width control (top) allows you to increase the apparent "wideness" of the stereo signal for the corresponding frequency band (low, mid, high as defined by the crossovers). Moving the control to the left (negative) gives an apparent narrowing of the sound. Moving to the right (positive) gives an apparent widening of the sound. These will also be perceived as louder and quieter respectively. Use care when using the stereo width controls as they can be taken too far. Clicking the right mouse button on the stereo width control will reset the value to 0.0/centre. The Solo check box will allow you to hear only the signal for the corresponding frequency band (low, mid, high as defined by the crossovers). You can combine more than two Solo check boxes to effectively mute one band. The Bypass button will bypass the compressor and stereo effects for the corresponding frequency band.
1.11. Limiter

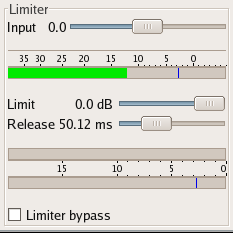
The limiter is a "lookahead" brickwall limiter. You can set the input level, the limit in dB, and the amount of time to look ahead. Using a lookahead limiter allows the limiter to more smoothly compress the signal prior to hitting the limit. The larger the time setting the smoother the limiting (within reason). The meters show input signal, compression, and output signal. Clicking the right mouse button on the input or limit control will reset the value to 0.0. You can use the limiter check box to bypass the limiter effect.
1.12. Boost

The boost control allows you to add simulated "tube like" boost to the signal prior to output. This is done to taste (New England mild to Cajun spicy). Clicking the right mouse button on the boost control will reset the value to 0.0.
1.13. Output

The output control is used to lower the output level. Normally this is left at the top (0 dB) to get the most volume output. The meters show the stereo output signal levels. Clicking the right mouse button on the output control will reset the value to 0.0.
1.14. Bypass

The ever popular bypass button is used to bypass all of the dynamics processing effects so that you can listen to the unprocessed signal. There is a built-in delay with the bypass that is supposed to match the processing delay due to the effects used. This will allow you to bypass without hearing a "jump" in the sound. Bypass can be toggled with a "b" hotkey. When bypass is on, background of its button becomes red.

2. Menus
2.1. File
The file menu allows you to open and save JAMin setting/scene files as well as exit the program. The usual band of suspects is available. By default .jam files are stored in your home directory in the .jamin directory but they can be stored anywhere. The New entry button will reset all effects in the session and clear all scenes.
2.2. Edit
There are three options available in the edit menu — Undo, Redo and Preferences. It is much easier to use the hotkeys (Ctrl+Z and Ctrl+R) for undo/redo actions, but if you just have to use a menu, here it is.
2.3. Ports
The ports menus allow you to connect input and output ports to/from other JACK enabled applications. This is provided as a convenience. Usually it is easier to do this using qjackctl or qjackconnect. You can use the Groups menus to connect/disconnect both a left and right input or output at the same time. If you have more than 2 lines for a specific application (like Ardour with an envy24 based card) this will connect/disconnect the first two.
2.4. Help
The help menu provides information on using help in JAMin. In addition to information on context sensitive help (General) and hotkey definitions (Keys), there is information about the authors of JAMin (About JAMin) and a list of all the OS packages that JAMin relies on (About Prerequisites).
3. Customizing JAMin

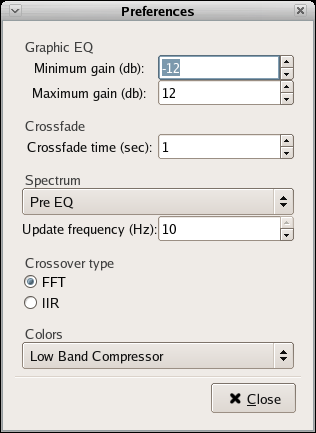
The Preferences dialog, available via Edit menu lets you setup JAMin to suit your needs best.
- It allows you to set the crossfade time. This is the amount of time it takes to fade between different settings when you change scenes. The default value is 1 second.
- You can also change almost all of the colors used in JAMin (such as the Low Band Compressor color) as well as reset all of the colors to their default value.
- It allows you to set the minimum and maximum Y range in dB for the hand-drawn EQ (HDEQ) and the 30 band graphic EQ (GEQ).
- It also allows you to pick the signal that will be used for the spectrum display in the HDEQ and spectrum windows. This will be either Pre EQ, Post EQ, Post Compressor, or Output. In addition you can set the update frequency for the spectrum displays. Setting this to 0 will disable the spectrum display. This can be useful to decrease CPU load.


